Mt. Fuji Photography Guide: Camera Settings, Locations, and Timing
Master Mt. Fuji photography with optimal camera settings, best locations, and timing tips for stunning shots of Japan's iconic mountain.
What makes Mt. Fuji photography challenging?
Mt. Fuji is visible only about one-third of the year, and conditions change rapidly. The mountain creates its own weather patterns, often hiding behind clouds even when skies appear clear at ground level. Successful photography requires understanding visibility patterns, arriving at optimal times, and having backup plans ready.
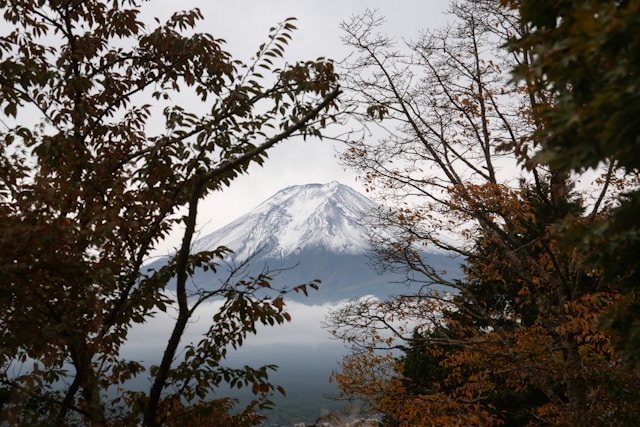
Photographing Mt. Fuji ranks among the most rewarding challenges in landscape photography. The perfectly symmetrical cone, snow-capped peak, and stunning foreground options create iconic images. But capturing that perfect shot requires more than showing up with a camera.
This guide covers everything from camera settings and lens selection to the best locations and timing strategies. Whether you shoot with professional gear or a smartphone, these techniques will dramatically improve your chances of capturing Japan's most famous landmark.
Table of contents
- Understanding the visibility challenge
- Camera settings for Mt. Fuji
- Lens selection and focal lengths
- Best photography locations
- Timing and lighting
- Composition techniques
- Smartphone photography tips
- Frequently asked questions
- Check current conditions
Understanding the visibility challenge
Before discussing camera settings, understand that visibility determines everything. The best time to see Mt. Fuji is during winter months when visibility rates reach 50-60%. Summer drops below 25%, making photography trips highly uncertain.
Our visibility scoring methodology analyzes cloud cover, humidity, and atmospheric conditions to predict viewing chances. Scores above 70 indicate good photography conditions. Below 50, consider postponing your shoot.
The Japanese have a saying that Mt. Fuji is "a shy mountain" because it hides behind clouds so frequently. Even during peak winter months, prepare for the possibility that clouds will obscure your subject. Build flexibility into your photography plans.
When visibility works in your favor
Winter brings Siberian high-pressure systems that push dry air over Japan. This reduces the humidity that creates haze over long distances. After cold fronts pass, visibility often becomes exceptional for a day or two.
Check our real-time forecast before traveling. High visibility scores combined with clear morning forecasts create ideal photography conditions.
Camera settings for Mt. Fuji
Mt. Fuji photography typically involves landscape techniques, but the specific settings depend on your shooting conditions and creative goals.
Daytime landscapes
For classic daytime shots with maximum sharpness throughout the frame:
- Aperture: f/8 to f/11 for optimal sharpness and depth of field
- ISO: 100-400 to minimize noise
- Shutter speed: Whatever achieves proper exposure (typically 1/125 to 1/500)
- Focus: Manual focus at hyperfocal distance, or focus one-third into the scene
Most landscape lenses perform best around f/8. Stopping down further to f/16 or beyond introduces diffraction that actually reduces sharpness.
Sunrise and golden hour
The soft light before 9am produces the best colors for Mt. Fuji photography. Adjust settings for lower light:
- Aperture: f/8 for sharpness, or open to f/4-5.6 if light is very low
- ISO: 400-800 as needed
- Shutter speed: Use a tripod for exposures longer than 1/60 second
- White balance: Daylight or slightly warm to preserve golden tones
Reflection photography
For mirror-like lake reflections, stillness matters more than any camera setting. However, these technical choices help:
- Aperture: f/8 to f/11 for sharpness from foreground water to distant mountain
- ISO: 100 for cleanest image quality
- Shutter speed: 1/30 to several seconds depending on water movement
- Tripod: Essential for sharp reflections
According to Kawaguchiko.net, calm water conditions for reflections occur most reliably at dawn before wind picks up.
Night and astrophotography
For Milky Way shots with Mt. Fuji:
- Aperture: f/2.8 or wider
- ISO: 3200-6400
- Shutter speed: 10-25 seconds (use 500 rule to avoid star trails)
- Focus: Manual focus on stars using live view magnification
Lens selection and focal lengths
Your lens choice dramatically affects how Mt. Fuji appears in your images.
Wide-angle lenses (14-24mm equivalent)
Wide angles work best when you want to include foreground elements like lakes, cherry blossoms, or the Chureito Pagoda. The Fujifilm House of Photography notes that anything below 24mm emphasizes the horizon's curvature and creates a feeling of open space.
Benefits of wide-angle:
- Include dramatic foregrounds
- Capture pagoda and mountain together
- Create sense of depth and scale
- Easier to achieve large depth of field
Standard zoom (24-70mm equivalent)
The most versatile option for Mt. Fuji photography. This range handles everything from environmental scenes to tighter compositions of the mountain itself.
Telephoto lenses (70-200mm equivalent)
Telephoto compression makes Mt. Fuji appear larger relative to foreground elements. Use this for:
- Isolating the mountain from distracting surroundings
- Compressing layers of scenery
- Shooting from Tokyo observation decks where the mountain is distant
- Creating abstract compositions of the peak
From Tokyo observation decks, telephoto lenses help capture a larger mountain despite the 100km distance.
Best photography locations
Each location offers different perspectives and composition opportunities. For detailed comparisons, see our complete Mt. Fuji viewing locations guide.
Chureito Pagoda
The most iconic Mt. Fuji composition combines the five-story pagoda with the mountain behind cherry blossoms or autumn foliage. According to Chris and Wren's World, the 398 steps to the viewing platform take 10-20 minutes depending on fitness.
Photography tips for Chureito:
- Arrive before sunrise for best light and fewer crowds
- Tripods are currently banned at the viewing deck
- The sun rises to the left, creating natural contrast
- Spring cherry blossoms (early-mid April) and autumn colors (November) provide the best foregrounds
- Winter offers clearest visibility of the snow-capped peak
Lake Kawaguchiko
The northern shore of Lake Kawaguchiko produces the famous "Sakasa Fuji" (upside-down Fuji) reflection. Ubuyagasaki point is particularly well-known for reflections.
Photography tips for Kawaguchiko:
- Dawn offers calmest water for reflections
- Use a tripod and low ISO for maximum sharpness
- The Kawaguchiko Ohashi Bridge with Mt. Fuji makes a popular composition
- Oishi Park provides symmetrical ridge line views with seasonal flowers
Lake Motosu
The view from Lake Motosu's northwestern shore appears on Japan's 1,000 yen note. This is the classic Fuji silhouette that defines the mountain's iconic status.
Lake Shoji and Lake Tanuki
Smaller and less crowded, these lakes offer tranquil reflections especially at dawn. Lake Shoji features a simple bench by the shore that creates romantic compositions.
Timing and lighting
When you shoot matters as much as where you shoot.
Golden hour advantage
The hour after sunrise and before sunset provides warm, directional light that adds dimension to the mountain. The Japan National Tourism Organization recommends early morning hours when Mt. Fuji is most visible and atmospheric conditions are clearest.
Our data shows visibility scores average 12 points higher before 9am compared to midday. The combination of better light and better visibility makes sunrise photography vastly more productive than afternoon attempts.
Seasonal considerations
Winter (December-February): Best visibility at 50-60%, snow-capped peak, crisp air. Cold temperatures require extra batteries and warm clothing.
Spring (March-May): Cherry blossom season peaks in early-mid April around Chureito Pagoda. Visibility decreases as humidity rises through spring.
Summer (June-August): Challenging conditions with visibility below 25%. If you must shoot in summer, focus exclusively on early morning attempts.
Autumn (September-November): Autumn colors peak in early-mid November. Visibility improves as summer humidity fades.
Apps for planning
Use apps like PhotoPills, Sun Surveyor, or The Photographer's Ephemeris to predict exactly where the sun will rise relative to the mountain from your chosen location. This helps you position yourself correctly before golden hour begins.
Composition techniques
Strong composition transforms a snapshot into a memorable photograph.
Foreground elements
Mt. Fuji alone can feel static. Add interest by including:
- Cherry blossoms or autumn leaves
- Lake reflections
- Traditional architecture (pagodas, torii gates)
- Tea plantations with leading lines toward the mountain
- Seasonal flowers (lavender at Oishi Park, kochia bushes in autumn)
Leading lines
The rows at Obuchi Sasaba tea plantation create natural leading lines that draw the eye toward Mt. Fuji. Look for paths, shorelines, or architectural elements that guide viewers into the frame.
Rule of thirds and alternatives
Place Mt. Fuji on a third line rather than dead center for dynamic compositions. Alternatively, center the mountain when shooting perfect reflections where symmetry is the goal.
Framing
Use tree branches, torii gates, or architectural elements to frame Mt. Fuji. This adds depth and context while directing attention to the mountain.
Smartphone photography tips
Professional gear isn't required for compelling Mt. Fuji images. Modern smartphones capture excellent landscape photos with these techniques:
Maximize your phone's capabilities
- Use the main camera lens rather than ultra-wide (less distortion)
- Enable HDR mode for balanced exposure between bright sky and darker foreground
- Tap to focus on Mt. Fuji, then adjust exposure manually if needed
- Use grid lines to align horizons and apply rule of thirds
Stability matters
- Prop your phone against a stable surface or use a small tripod
- Use the timer function to eliminate shake from tapping the shutter
- For reflection shots, keep the phone as still as possible
Editing on the go
- Adjust contrast to cut through any remaining haze
- Slightly increase clarity or structure for definition
- Warm the white balance slightly for sunrise shots
- Crop to improve composition
Frequently asked questions
What is the best camera for Mt. Fuji photography?
Any camera with manual controls works well. The limiting factor is usually visibility, not equipment. A smartphone on a clear winter morning will capture better images than professional gear on a hazy summer day. Focus on being there when conditions are right.
Do I need a tripod for Mt. Fuji photography?
For sunrise, reflection, and night photography, yes. A tripod enables longer exposures and sharper images in low light. Note that tripods are currently banned at Chureito Pagoda's viewing deck, so plan alternative techniques there.
What time should I arrive for sunrise photography?
Arrive 30-45 minutes before sunrise to set up and find your composition in low light. Check sunrise times for your specific date, as they vary significantly between winter (around 6:45am) and summer (as early as 4:30am).
How do I check if Mt. Fuji will be visible for my shoot?
Check our real-time visibility forecast the evening before. Scores above 70 indicate good photography conditions. The page also embeds live webcam feeds for visual confirmation of current conditions.
Check current conditions
Ready to photograph Mt. Fuji? Check our real-time Mt. Fuji visibility forecast updated every 15 minutes with current weather data.
High visibility scores (70+) indicate favorable conditions for photography. Plan your shoot around these windows for the best results.
Planning to photograph other landmarks? Explore visibility forecasts for:
- Mt. Fuji - Japan's iconic peak
- Mt. Rainier - Pacific Northwest's highest
- Denali - North America's tallest
More Articles
Best Time to See Mt. Fuji: A Complete Visibility Guide
Planning to see Mt. Fuji? Learn the best months, times of day, and weather conditions for clear views of Japan's iconic mountain.
Best Mt. Fuji Viewing Locations: Kawaguchiko vs Tokyo vs Hakone Compared
Compare the best places to see Mt. Fuji with real visibility data. Find out which location offers the best views for your trip.
Is Mt. Fuji Visible Today? How to Check Real-Time Conditions
Is Mt. Fuji visible today? Check real-time forecasts, live cameras, and visibility scores to plan your best Fuji viewing trip.