How to Photograph Northern Lights: Camera and Phone Settings
How to photograph northern lights: real camera and phone settings, plus why your lens records aurora on nights your eyes see almost nothing.

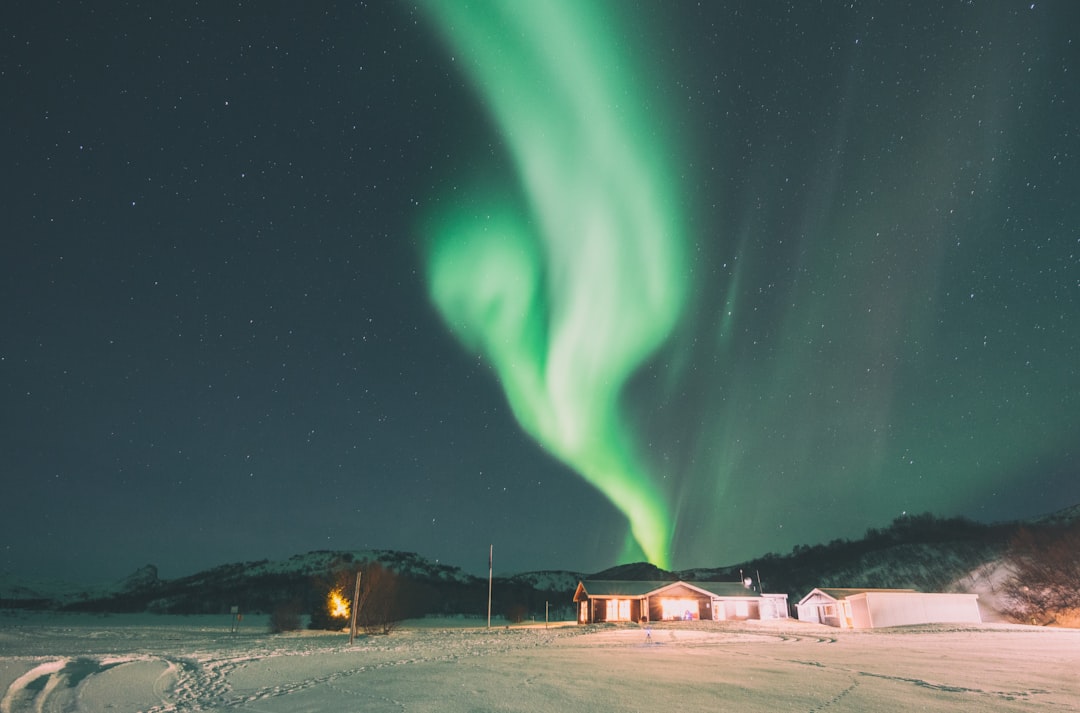
How do you photograph the northern lights?
Put the camera on a tripod, shoot RAW in manual mode, open the lens to its widest aperture (f/1.4 to f/2.8), set ISO 1600 to 3200, and start at a five-second exposure, shortening it as the aurora speeds up. Focus manually on a bright star before it gets dark, and turn off long-exposure noise reduction. On a phone, use Night mode at maximum exposure with the phone braced or tripod-mounted. Settings cannot fix an empty sky, so check the live northern lights forecast for your exact location before you drive anywhere.
Most guides on how to photograph northern lights hand you a settings table and stop. The table matters, but it is the least interesting part of the night. The interesting part is that a camera and a human eye are not looking at the same sky. Your sensor accumulates photons for as long as the shutter stays open. Your retina does not.
That difference is why people standing in a field arguing about whether the grey band on the northern horizon is a cloud will look at the back of someone's camera and see a green pillar. It is also why the right question is not "what ISO should I use" but "is tonight a camera night, an eye night, or neither."
Table of Contents
- Northern Lights Camera Settings
- Why Your Camera Sees Aurora Your Eyes Cannot
- Shutter Speed Is Set by Movement, Not Brightness
- Focus: The Failure That Ruins Whole Nights
- How to Photograph Northern Lights With a Phone
- Shooting From Below the Auroral Oval
- The Daylight Checklist
- Cold, Batteries, and Condensation
- Processing Without Overcooking It
- Frequently Asked Questions
Northern Lights Camera Settings
The baseline northern lights camera settings are manual mode, RAW files, the widest aperture your lens offers, ISO 1600 to 3200, and a shutter somewhere between two and fifteen seconds. Everything else is adjustment.
| Setting | Start here | Change it when |
|---|---|---|
| Mode | Manual (M) | Never. Auto metering reads a dark sky as an error. |
| File format | RAW | Never. JPEG bakes in a white balance you will want to undo. |
| Aperture | Widest (f/1.4 to f/2.8) | Only if corner stars look bad; f/2 is a fair compromise. |
| ISO | 1600-3200 | Drop to 800 under a bright aurora or full moon; 6400 if very faint. |
| Shutter | 5 seconds | Constantly. See the next section. |
| Focus | Manual, set on a star | Recheck after a big temperature drop. |
| White balance | 3500-4000K | Fine-tune in editing; RAW makes this free. |
| Stabilisation | Off | Only turn it on if you are handholding, which you should not be. |
| Long-exp. NR | Off | It doubles every frame's capture time. Leave it off all night. |
| Drive | 2-second timer | Or use a remote or intervalometer. |
Two of those deserve a sentence more. Aperture is the only setting that gathers more light without costing you anything, which is why a fast wide lens (14mm to 24mm at f/1.4 to f/2.8) beats a better camera body with a slow kit zoom. And ISO is not a quality dial. Raising ISO does not gather more light; it amplifies what the aperture and shutter already collected. Use it to reach a usable brightness at the shutter speed the aurora is forcing on you, not as a first resort.
Turning off long-exposure noise reduction is the single most common fix I would give a beginner. With it on, the camera shoots a matching "dark frame" after every exposure, so a ten-second shot occupies twenty seconds of your night. During a breakup that lasts five minutes, that is half your frames gone.
Why Your Camera Sees Aurora Your Eyes Cannot
A camera records aurora on nights when your eyes see almost nothing, because the sensor sums light over seconds while human night vision runs on rod cells that see no colour at all. Rods are far more sensitive than cones but they are monochrome, which is why faint aurora reads as a pale grey arc in person and a saturated green curtain on the back of the camera. EarthSky's explainer on aurora colour puts it bluntly: the photographer often does not know what colour the display is until he looks at the LCD.
This is not a curiosity. It changes what counts as a viable night.
Our aurora forecast grades every hour into three verdicts rather than two: "Not tonight", "Camera only", and "Yes, naked eye". The camera tier is not a hedge. It is defined by measurably looser thresholds on three independent factors:
| Factor | Naked-eye threshold | Camera-only threshold |
|---|---|---|
| Geomagnetic activity | Your location's full Kp threshold | One full Kp step lower |
| Cloud cover | 30% or less | Up to 60% |
| Darkness | Sun at least 10 degrees below horizon | Sun 6 degrees below horizon (end of civil twilight) |
Read that table as three separate gifts. The camera buys you a weaker storm, a partly cloudy sky, and roughly an extra half hour at each end of the night. In Fairbanks or Tromsø, where the naked-eye Kp threshold is about 1, the camera tier barely matters because the aurora is overhead anyway. In Michigan or Minnesota, where you need roughly Kp 5 to see anything with your eyes, the camera tier turns a fair number of "nothing happened" nights into a photograph.
The practical instruction that falls out of this: on any night the forecast is borderline, point the camera north and take a ten-second frame at ISO 3200 every fifteen minutes, even when the sky looks dead. You are not photographing what you can see. You are sampling.
The flip side is an expectation problem. If you show someone a heavily processed image and then drive them out to a Kp 5 night in the lower 48, they will be disappointed by a grey smudge. Manage that before you go, not after. Our field guide on how to see the northern lights covers the same gap from the viewer's side.
Shutter Speed Is Set by Movement, Not Brightness
Choose your shutter speed by how fast the aurora is moving, not by how bright it is. This is the rule that separates photographs with structure from green fog.
Aurora activity comes in substorms. The University of Alaska Fairbanks Geophysical Institute describes the auroral substorm as a cycle running from a quiet arc through brightening, a westward travelling surge, and breakup, sometimes completing in as little as one to three hours, with as many as four cycles observed in a single night. The breakup is the shot you drove out for, and it does not wait for you to work out your settings.
| What the sky is doing | Shutter | ISO adjustment |
|---|---|---|
| Faint static glow on the horizon | 10-20 seconds | 3200-6400 |
| Quiet green arc, slow drift | 8-15 seconds | 3200 |
| Arc brightening, structure appearing | 4-8 seconds | 1600-3200 |
| Rays and curtains rippling | 2-4 seconds | 3200-6400 |
| Full breakup or corona overhead | 0.5-2 seconds | 6400 and accept noise |
The logic is straightforward. A fifteen-second exposure during a breakup averages fifteen seconds of a rapidly restructuring curtain into a single blurred wash. You gain brightness and lose everything that made the display worth photographing. When rays start to form, cut the shutter and raise ISO to compensate. Noise is recoverable. Smeared structure is not.
Star trailing sets a separate ceiling. The old 500 rule divides 500 by your effective focal length to estimate the longest exposure that still renders stars as points, so a 20mm lens on full frame gives about 25 seconds and the same lens on APS-C gives roughly 17. The more precise NPF rule accounts for aperture and pixel pitch and usually returns something shorter. Here is the part most guides omit: for active aurora, the aurora's own motion almost always demands a shorter shutter than the stars do. If you are shooting at four seconds because the curtains are moving, the star rule never binds.
Focus: The Failure That Ruins Whole Nights
Set focus manually before dark, verify it at 100 percent magnification, then physically lock it. Nothing else on this page will save a night of soft frames.
Autofocus will hunt and fail on a dark sky. The infinity mark engraved on most lens barrels is not reliably at true infinity, and focus can shift slightly as a lens cools over several hours. Three approaches, in order of preference:
- Daylight setup. Focus on a distant horizon before sunset, switch the lens to manual, and tape the focus ring with gaffer tape. Fastest and most robust.
- Live view on a star. Point at the brightest star or planet available, magnify live view to 10x, and turn the ring until the point is at its smallest. Retape.
- A distant light. A far-off streetlight or a headlamp placed a few hundred metres away works when no stars are visible through thin cloud.
Verify by taking a frame and zooming into a star, not into the aurora. Aurora has no hard edges, so a soft aurora looks identical to a sharp one on a small screen. Stars do not lie.
How to Photograph Northern Lights With a Phone
A modern phone can genuinely photograph the northern lights, but only when it is held completely still and running its longest night exposure. Handheld phone shots of faint aurora almost never work.
iPhone
Night mode turns on automatically in low light. To lengthen the exposure, Apple's instructions are to tap the arrow above the viewfinder, tap the Night mode button, then use the slider above the shutter button to choose Max. The available maximum varies with the supported iPhone model, the light level, and how stable the phone is; Apple does not publish one maximum exposure time that applies to every iPhone.
Four things to get right:
- Use the main 1x camera, not the ultrawide or telephoto. It has the largest sensor and fastest aperture.
- Use the timer or a Bluetooth remote. Tapping the screen shakes the phone through the whole exposure.
- Avoid digital zoom entirely. Crop later if you must.
- Shoot ProRAW if your model offers it, then correct white balance in editing.
If your phone offers a choice, start around ten seconds. Go to the available maximum only when the aurora is faint and slow. A bright, moving display at a long exposure turns into a green cloud.
Pixel phones
Google's 2019 engineering description of astrophotography mode on the Pixel 4 explains that it captured at most 15 frames of up to 16 seconds each, roughly four minutes in total, with the per-frame cap chosen so stars stayed as points rather than short trails. The same Google Research article says that generation allowed up to four minutes on Pixel 4 and one minute on Pixel 3 and 3a. Treat those figures as an explanation of those models, not as a specification for every current Pixel or Android phone.
That long-stacked design is optimized for stars, while aurora moves. For a quiet arc it can work well; for an active display, use standard Night Sight or, where your phone offers it, manual control with a shorter exposure. On non-Pixel Android phones, night and astrophotography modes vary by manufacturer and model, so check what the camera app actually offers rather than assuming Pixel timings apply.
What phones still cannot do
Phones struggle with the faintest displays, where the aurora sits close to the sensor's noise floor. They also destroy dark adaptation: a phone screen at full brightness resets your night vision, and everyone else's within twenty metres. Turn brightness down before you leave the car.
Shooting From Below the Auroral Oval
Below roughly 55 degrees of latitude, aurora usually appears as a low band of colour on the northern horizon rather than curtains overhead, and that single fact changes your lens choice, your composition, and your exposure.
Almost every aurora photography guide on the internet is written from Tromsø, Abisko, or Iceland, where the display fills the sky. If you are shooting from Washington State, the Great Lakes, or northern England, you are photographing the top edge of something whose base is below your horizon. Adjust accordingly:
- Go longer, not wider. A 14mm lens spreads a narrow horizon band across a frame that is mostly empty. Something in the 24mm to 35mm range often frames the display far better.
- Expect red and magenta before green. The green oxygen emission sits lower in the atmosphere than the red, so from a distance the tall red tops clear your horizon while the green base does not. Photographs from the lower 48 often come back pink where observers expected green.
- You can afford longer shutters. The far edge of the oval typically moves more slowly than an overhead corona, so 8 to 15 seconds is usually safe unless a storm pushes the oval directly over you.
- Foreground must face north. A beautiful lake to your south is worthless tonight. Scout north-facing shorelines, ridges, and open water in daylight.
- Town glow is the real enemy. Light pollution on the northern horizon competes directly with the aurora. Thirty minutes of driving is usually worth more than a stop of aperture.
Comparing forecasts across latitudes makes the difference obvious. Check the same night on Tromsø, where the aurora is often overhead at low activity, against Seattle or Scotland, where a genuine storm is required. If you want to understand why those thresholds differ so much, our explainer on the Kp index covers the geometry, and what causes the northern lights covers the physics behind the colours.
The Daylight Checklist
Every setting that needs two working hands and a lit screen should be done indoors, hours before you go out. Cold fingers and a red headlamp are not a good environment for navigating menus.
- Focus set on infinity and the ring taped
- Long-exposure noise reduction: off
- In-body and in-lens stabilisation: off (they can introduce blur on a tripod)
- RAW, manual mode, two-second timer armed
- Screen brightness at minimum, viewfinder eye sensor disabled if it keeps waking
- Batteries charged, spares in an inside jacket pocket against your body
- Memory cards formatted, with spare capacity for hundreds of frames
- Tripod legs extended and locked once while wearing the gloves you will actually wear
- Everything saved to a custom mode slot (C1, U1) so one dial click restores it
- Headlamp switched to red, and agreed with everyone else in the group
That last one is not politeness. Dark adaptation takes twenty to thirty minutes to build and one white light to destroy, and it is the difference between seeing a faint arc and seeing nothing at all.
Cold, Batteries, and Condensation
Cold rarely damages a modern camera, but it drains batteries fast and it fogs your lens the moment you come back indoors. Lithium-ion cells can lose roughly 20 to 30 percent of their usable capacity at low temperatures, and that loss is mostly temporary: a battery that dies at minus 15 will often recover most of its charge after warming in a pocket.
So carry three batteries, keep two warm against your body, and rotate them. Do not charge a battery that is still frozen.
Condensation is the more expensive risk. Warm indoor air hitting a cold lens and cold internal electronics puts water where you do not want it. Before you go inside, seal the camera in a zip bag or your camera bag and let it come up to room temperature over an hour or two before opening. Outside, never breathe on the front element; it frosts instantly. A cheap USB lens-warmer band wrapped around the barrel prevents dew and frost on long sessions and costs less than one ruined night.
If you are shooting with a guide rather than alone, some of this is handled for you, though a tour buys mobility and warmth rather than aurora. We break down what that is actually worth in our guide to choosing a northern lights tour.
Processing Without Overcooking It
Shoot RAW and do most of the work with three sliders: white balance, exposure, and noise reduction. The green in a well-exposed aurora frame is already close to correct at around 3500K, so if you find yourself pushing saturation hard, your exposure was probably too short rather than your colours too weak.
Check the histogram in the field, watching the green channel in particular. A bright aurora clips green long before the overall image looks bright, and a clipped green channel cannot be recovered. If the green edge is stacked against the right wall, drop your ISO one stop or shorten the shutter. The same discipline applies to any subject that only shows up under specific conditions, which is why our Mt. Fuji photography guide leads with forecasting rather than gear.
Frequently Asked Questions
What camera settings do I need for the northern lights?
Manual mode, RAW, the widest aperture your lens has (ideally f/2.8 or faster), ISO 1600 to 3200, and a shutter of about five seconds as a starting point. Shorten the shutter to one or two seconds when the aurora starts moving quickly, and lengthen it to fifteen or twenty when it is faint and static.
Can you photograph the northern lights with a phone?
Yes, if the phone is completely still. Use Night mode or Night Sight with a tripod or a solid surface, set the exposure slider to its maximum for faint aurora, and use the timer so you are not touching the screen. Handheld phone shots of anything but a very bright display will be blurred.
Do you need a tripod to photograph the northern lights?
Effectively yes. Every usable aurora exposure is at least one second long, and no stabilisation system compensates for handholding at that duration. A rock, a car roof, or a fence post will work in a pinch, but a tripod lets you compose deliberately and reframe as the display moves.
Why do the northern lights look green in photos but grey to my eyes?
Because human colour vision shuts down in low light. At aurora brightness your eyes are running mostly on rod cells, which are extremely sensitive but see only in greyscale, while a camera sensor accumulates light over several seconds and records the colour directly. Bright displays do activate your cones, which is when you finally see green with your own eyes.
What lens is best for northern lights photography?
A fast wide-angle prime in the 14mm to 24mm range at f/1.4 to f/2.8 is the standard choice for overhead aurora. If you are shooting from a lower latitude where the display sits on the northern horizon, a 24mm to 35mm focal length usually gives a better-filled frame.
Before You Pack the Car
Gear and settings only matter on nights when there is something to shoot. Work in this order: check whether the activity, cloud cover, darkness, and moon line up for your specific spot, then decide whether it is a naked-eye night, a camera-only night, or a night to stay home.
That first step is the one our tools exist for. Pull up the live aurora verdict for your location, look at the hour-by-hour timeline, and notice how often "Camera only" appears on nights the headline Kp number looks unremarkable. Those are the nights most people skip and photographers do not.
If mountains are more your subject, the same forecast-first habit applies to our live visibility scores for Mt. Fuji, Mount Rainier, and Denali.
More Articles
How to See the Northern Lights: A Practical Field Guide
How to see the northern lights: the four-factor field checklist, activity, clouds, darkness, and moonlight, that decides every aurora night.
The Kp Index, Explained: Why the Aurora Number Is Not a Promise
The kp index is a 0 to 9 scale of geomagnetic activity. Here is what the aurora number really means, and why a high value is no promise.
Northern Lights Tour: How to Choose One (and When to Skip It)
A northern lights tour can only fix two of the four things that decide whether you see aurora. Here is how to choose one, and when to skip it.